Vintage Keeper Tuscany 220 Manuel d'instructions
Naviguer en ligne ou télécharger Manuel d'instructions pour Refroidisseurs de vin Vintage Keeper Tuscany 220. Vintage Keeper Tuscany 220 Instruction manual Manuel d'utilisatio
- Page / 20
- Table des matières
- MARQUE LIVRES
- TUSCANY 1
- READ BEFORE YOU START 3
- HARDWARE KIT 4
- BACK PANEL 5
- STEP 2 : CABINET ASSEMBLY 6
- Insert Cam Cap (A) in 7
- BASE TAB 8
- CABINET 9
- PHONE BOOK 10
- Insert Air Deector 12
- Tab rst 12
- CAUTION : 13
- Snap LIGHTCOVER over the 14
- STEP 7 : DOOR INSTALLATION 15
- DISPLAY EXAMPLE 16
- MODEL 110 17
- MODEL 220 17
- TROUBLE SHOOTING GUIDE 18
Résumé du contenu
~1~TUSCANY 1 1 02 2 0Plus WINE CELLARASSEMBLY & OPERATION MANUAL
~10~~11~SERIAL NUMBERPHONE BOOKSTEP 5 : COOLING UNIT INSTALLATION1BJBJScrew in Bolt (B) and Rubber Grommet (J) into top panel until grommet
~10~~11~STEP 5 : COOLING UNIT INSTALLATION CONTINUEDPHONE BOOKPHONE BOOK4Slide unit into the back opening and lock the HOOK WING over the LEFT
~12~~13~STEP 5 : COOLING UNIT INSTALLATION CONTINUEDInsert Drain Cup by angling the Drain Cup inserting back tab rst then push in front lip
~12~~13~ContainerOptional (not required) except as emergency drain.NOTE: If unit is operated according to specications overows will not occur.
~14~~15~1Snap LIGHTCOVER over the LIGHT45Fasten LIGHT CLIPS into mounting holes predrilled on front edge of TOP panelSnap LIGHT in LIGHT
~14~~15~Install TOP HINGE (G) with HEX BOLTS (C)NOTE : Adjust nal position of the door before tightening the boltsSTEP 7 : DOOR INSTALLATIONOpe
~16~~17~FEATURES: - Default SET temperature 57º F/14º C (ideal for wine storage). - Calibration option of the temperature sensor. - SET temper
~16~~17~MAXIMUM CAPACITIES AND LOADING TIPSMaximum capacities and sample loading arrangements for Vintage Keeper Tuscany wine cellars are illustrated
~18~~19~TROUBLE SHOOTING GUIDEAlthough each Vintage Keeper cooling unit has been carefully tested at every stage of manufacture, occasional problems a
~18~~19~LIMITED WARRANTY AND PRODUCT SUPPORTONE YEAR LIMITED WARRANTYIf your Vintage Keeper cooling unit or cabinet fails to perform as designed withi
~2~~3~
~20~TUSCANY 1 1 02 2 05648 McAdam Rd., Mississauga ON CAN L4Z 1T2Phone : 905.501.8582 Fax : 905.501.0889Toll free: 1.888.274.8813customerservice@vinta
~2~~3~1. LOCATING YOUR WINE CELLAR - Remember, it is not only an appliance but also a piece of furniture2. AREA FOR ASSEMBLING YOUR WINE CELLAR Cho
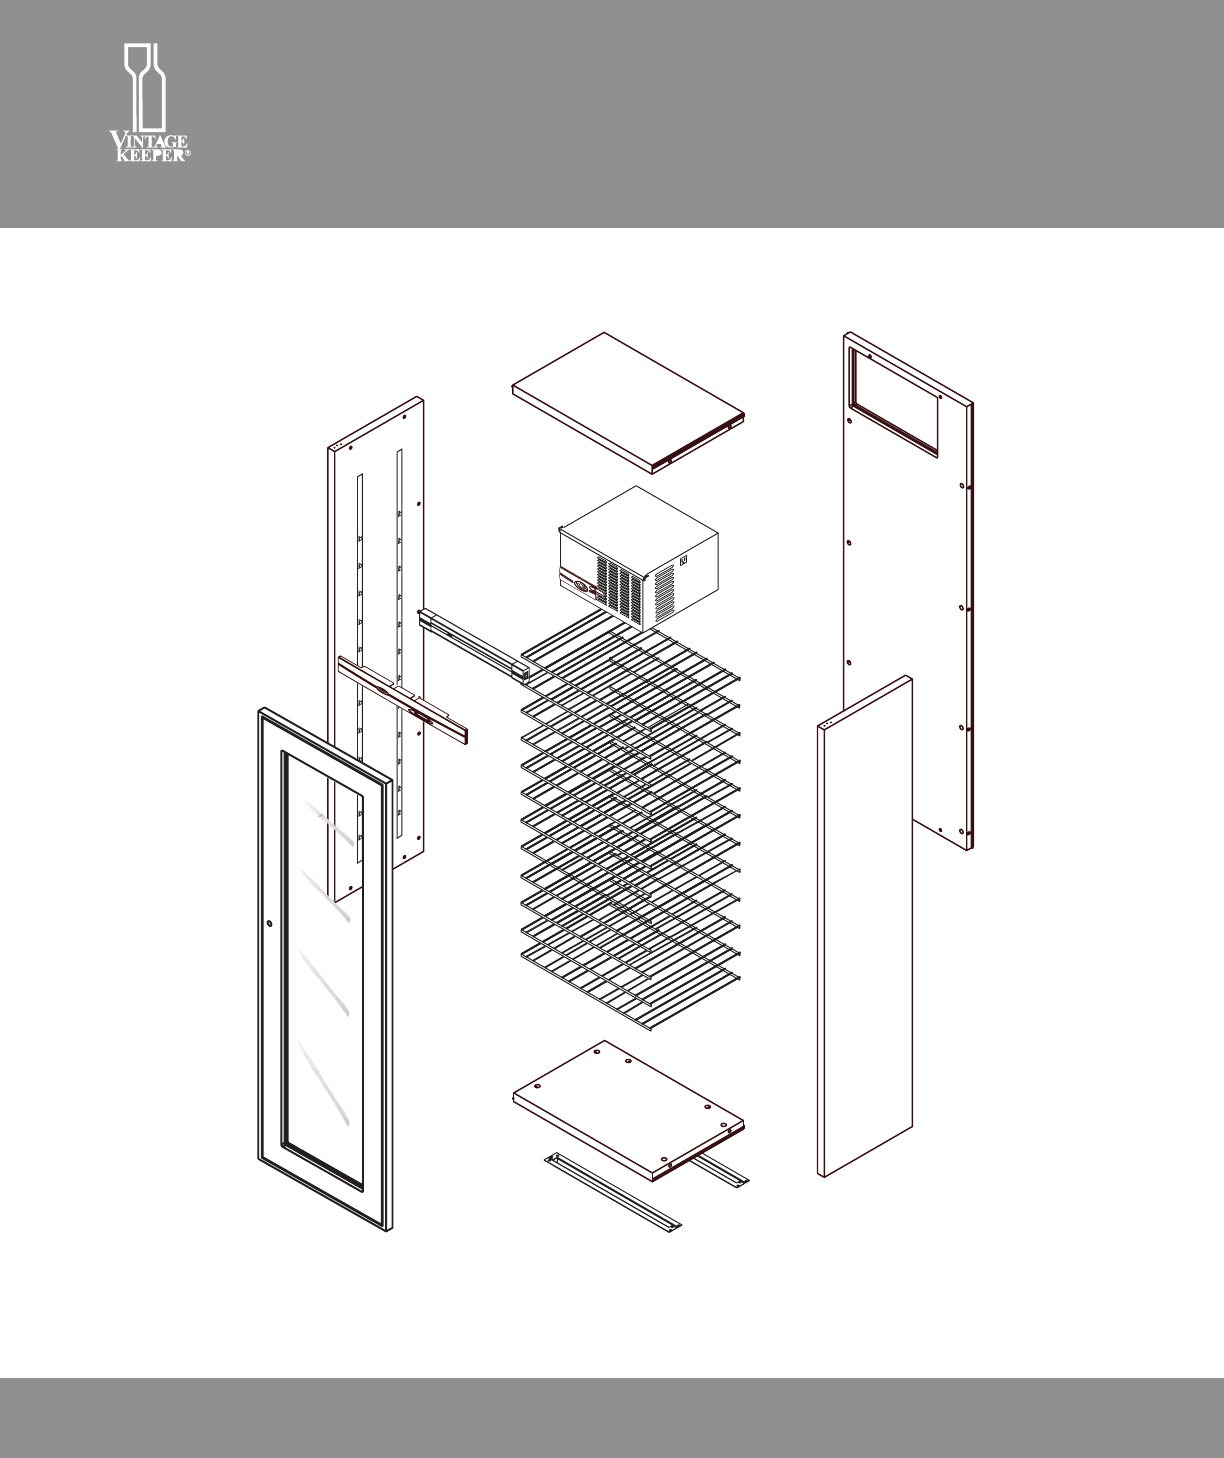
~4~~5~Cam Capx 20 (x24)*Phillips Boltx 2Hex boltx 14 Hex wrenchx 1 Camx 20 (x24)*Cam Pinx 20 (x24)*Hingex 2Legx 4 Washerx 1Rubber Grommetx 2 Panel Ins
~4~~5~Open Box V1.Install INSULATION STRIP to Back, Top, and Bottom Panels. PUSH IN FULLY!Insert Cam Pins (F) in BACK PANEL’S pre drilled holes
~6~~7~STEP 2 : CABINET ASSEMBLYAttach Top and Bottom to Back by CAREFULLY aligning edge holes over Cam Pins and gently push together to avoid
~6~~7~STEP 2 : CABINET ASSEMBLY CONTINUEDTOP !!!Open Box V5 or V2. Insert Cam Pins (F) into SIDE PANEL’S pre drilled holes both sides. Attac
~8~~9~Fasten BASE with HEX BOLTS (C)4BASE TABFRONT EDGECABINET BOTTOM FRONT BASE 134STEP 3 : HINGE,BASE AND LEGS INSTALLATIONRaise cabinet and adju
~8~~9~211CABINET BOTTOM STEP 4 : SHELVESBOTTOMTOPPRESSOpen box V4 Hook SHELVES into hangers starting from the bottom of cabinetHINT : 1
Plus de documents pour Refroidisseurs de vin Vintage Keeper Tuscany 220


Produits connexes et manuels pour Refroidisseurs de vin Vintage Keeper Tuscany 220
 (15 pages)
© 2020, manymanuals.fr. Tous droits réservés | 0.432 s |
 Manymanuals.com
 Manymanuals.de
 Manymanuals.fr
 Manymanuals.it
 Manymanuals.pl
 Manymanuals.cz
 Manymanuals.es
 Manymanuals-pt.com
Commentaires sur ces manuels